About Me

My photo
Proud single mom of one beautiful daughter who shares my love of sports and music. She doesn't share my love of the outdoors which I find weird. I love photography and wish I had a better camera!! Maybe someday...
Showing posts with label Photoshop. Show all posts

18 December, 2018

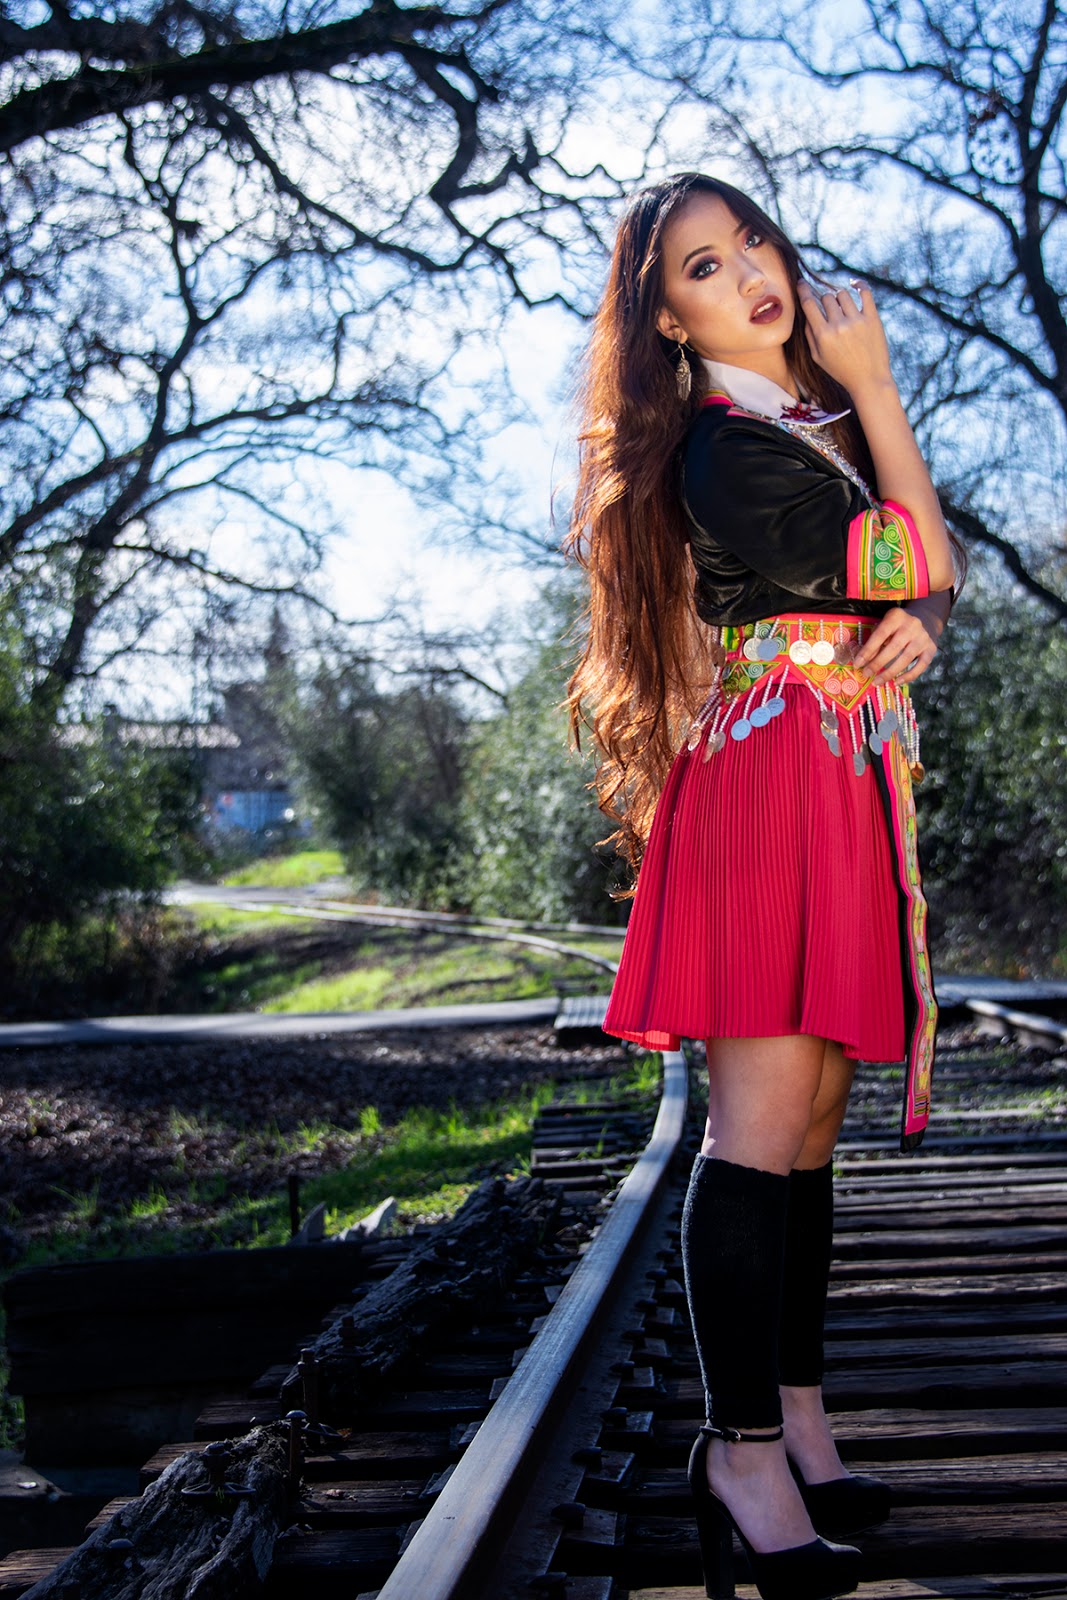
Sandy Yang - Railroad Tracks Mini Shoot

In my last post, I started sharing my photos of the incredibly talented model, Sandy Yang.  The first set were taken in Folsom by a little creek with a couple of bridges to work with.  So much fun!

After that, we moved to the abandoned railroad tracks. These tracks are so cool with grass and shrubs that form a kind of tunnel where the curve is.  I loved it.  

This is the end that heads out toward East Bidwell Road. 


And in the other direction is that cool tunnel effect.  


I had to include this "meta" picture of one of the other photographers poking into my shot.  lol  I think it's kind of a cool BTS look at how things are on these "mini-shoots".   Basically it's where about 4 photographers pay to take part in the shoot.  Some, like this one, are a nice free-for-all where everyone is courteous and works at the same time.  There's bound to be some juggling position and shots with other people in them.  

I actually like this because I like to try to get angles that are weird and/or shots where the model isn't focusing on me.  I just think the photos are more interesting than all with the model looking at camera. 


But of course, there isn't anything wrong with some good shots of the model looking into my lens too!


Okay, so this next photo is a different crop and edit as the one above.  I just love not only Sandy's pose and gorgeous looks but also the background, which is bokeh on one side and kind of swirly on the other.  I wanted to go for a fantasy type look so drew on some makeup and brought out her eyes with a little added effect.  I love it. 


And this next photo is just amazing to me.  She's so gorgeous and I love the pose, lighting, everything. 


I also love this next one.  She was taking a brief moment between shots and I just happened to catch the movement of her hair as she adjusted it.  I was sitting on the ground in front of here but a pretty good distance off. 

I cropped this next one square because I wanted to keep the bokeh-filled background.  I also broke a "rule" of composition (as I understand it, anyway) because normally one should leave more space on the side to which a subject is looking.  But I liked this angle better.  


This is probably my favorite of the whole shoot.  I don't know what it is but it grabs me.  It looks like a real moment.  


And this one too!  Similar, I know, but it's so beautiful!  I gave it a slightly purple tint because it's my favorite color and I think it really works.  


So much fun!  

Up next, we'll continue the series in studio for some lifestyle and street-wear portraits.  

xoxo

Nikon D3300

11 June, 2017

Shooting the Living at Preston School of Industry Ione, CA Part II

Welcome back!

In my last post, I was telling you all about Preston Castle in Ione and how I came to FINALLY start learning how to work with models.  This post continues my adventure but, instead of focusing on the Castle itself, it's going to contain what I feel were my best photos of the day.

Caveat: Some of the photos/poses were somewhat or complete duplicate of another shot and I couldn't really tell which was better.  So I split some of the photos between posts so as to avoid too much duplication in either post.  So you may experience some deja vu (or deja VIEW)! And actually, there are still some similar photos in this batch...some with a wider view or different edit - but in all cases, a different photo and all taken by yours truly.

And, just to help you remember where these photos were taken...

This is one of those similar photos I was talking about.  In my last post, you will see a photo that I took where a couple people happened to walk in front of the window just as I snapped my shutter. 

I asked Aubrey and Sarah to recreate it by holding hands in front of the window while I shot from two rooms over (sitting on the dirty floor I might add!)

While shooting Aubrey in the ambient light of the basement, I loved how the light shown on her face and thought it would be perfect for a "low-key" treatment.  So I shot this photo and only had to adjust the darkness around her a little in Photoshop Elements 11 (yes, I need to upgrade!).

Tim, the photo docent, helped me with this as I having some trouble with the light when Aubrey wasn't facing the window.  He had me adjust my ISO to 1600 which helped with the shadows.  The graininess works for a lot of these photos, although I wish had had remembered to readjust it when we went into the brighter rooms upstairs.
 More similar photos.  But I love how Sarah just literally matches the walls.  And the walls themselves, along with the angles of the rooms, are amazing!
 I edited Sarah with some luminosity to make her slightly ghost-like.

 I like to fool myself into thinking that these next two photos of Aubrey could be from a fashion-spread.  haha!  This one is for an accessories line...
 And this is a high-fashion ad for boots!

And I just love this one! Again, there is one in the last post almost exactly like this. But I had had her turn her head just a little and I think that makes the picture better.  


Original edit (different colored clothing on reflection in last post)


 This is one of my favorite shots of the whole day.  I was sitting on the floor and asked the girls to skip down the hall towards me.  I added some motion blur into the back to enhance the motion of their hair, feet, and clothes.  Flove!


This is a closer shot of a portrait-style shot in the last post.  I actually really like the way that the line of the banister leads to Aubrey's face and the direction in which she tilted her head (her idea) mimics the lines in the holes in the wall.  By that one thing she made the photo better!


 Here I shot Aubrey through holes in the wall as she sat in the next room.
You know I love my gimmicks!
 The ambient light in this room was very blue.  I like it and the way the sink point up to her.  Again, using your props and surrounding to enhance the object of the photo.

Me trying to get my damn Helios 44 lens to work!  Love the soft focus it created though.
 Ditto!  I had trouble getting that Russian knockoff to focus.  Just to be clear, I'm talking about the Helios lens.

 Steampunk vibe in High-Key edit.


I confess that I saw another photographer shooting a model in the infirmary and it gave me the idea for these last few photos.  She had her model's back to the window and was shooting down on her face, which was lifted up to catch the light.  But I saw the 'light lines' on the floor and asked Aubrey to sit mimicking the lines.  I then tried to catch the line on her eye while keeping the rest of the photo interesting as well.
 Definitely called for a "Low-Key" edit!

But the natural light looks just as awesome, if not better!


My unending thanks to Sarah and Aubrey for making a great day amazing.  Especially Aubrey who let me follow her around and ask her to do some really awkward things!

xoxo

Nikon D3300

05 July, 2015

Let's Get Random - Everyday Photos & Different Editing Tricks

So much of life, it seems to me, is determined by pure randomness.
~~Sidney Poitier

Every now and then I like to take my camera and just take photos at home.  I try to challenge myself into getting some good shots out of commonplace, everyday life.  

It's also interesting to look back a few years later to see what life was like.


Apparently my home life in 2014 was dominated by my two rescue kitties.  Or maybe it's just that they are such beautiful, fun, loving creatures, that I can't help but take photos of them when they're attending to their kitty lives.    

This my Chavy.  He's weird, but I love him. 


Handsome closeup. He loves to pet his own face.  No human can do it according to his standards. 

I like this shot.  Sometimes its okay to not have the complete subject in focus.  Here, I focused on the feather that Chavy was playing with to illustrate that the photo is still interesting and the "focus" is still on Chavy. 

This is another shot that I used an effect to enhance it.  The photo from the outline of the sliding glass door to the right of Chavy all the way to the left is not edited at all.  But there were a couple of things on my patio that ruined the shot, including a dirty gas can. 

In Photoshop Elements 11, I selected the area inside the window pane and used an adjustment filter with gradient to black out everything on the patio while still maintaining the photographic look and drawing the attention away from the bright red and back to my cute subject. 
Another closeup, but this time I cropped in closer to put the emphasis on his paw as he pets himself.

This is a kitty friend that lived right beside our parking spaces.  He LOVED Adie's car and would lay on it at all times.  When she wasn't home, he would sit on the stairs or the sidewalk, but never another car.  

I wanted to keep everything shades of grey, but the window was reflecting and the underside of the stairs was brown.  Again, I selected the areas that had reflections or other color tones and applied a gradient filter to them. 

Oddly enough, the cat looks kind of weird, as if I accidentally selected part of him and included him in the gradient map.  I assure you I did not.  It was just the part of him that was shadowed by the overhang.  I actually tried to fix it, but it was very stubborn. lol

These are the gorgeous blossoms on the tree that overhangs the balcony.  


Speaking of the balcony, we had hummingbird and finch feeders which actually enticed a lot of our feathered friends.  This is not a good picture but I was always to slow to get a picture or had to go get my camera and missed it.  lol  

However, using a "Sin City" affect in Photoshop Elements 11, I was able to get enough definition in the photo, even shooting through a dirty window and a screen.  

Sin City is an effect that I love to use.  It's basically keeping only one or two colors in a photo.  

And now, MOAR Cats!  These photos were taken on a very sunny day and my boys were loving laying on the cat tree in the sun.  The bright, yet indirect light made for some very good shots.


"I have been meditating on the very great pleasure which a pair of fine eyes in the face of a pretty [cat] can bestow." ~~  Mr. Darcy "Pride and Prejudice"


These two love this cheap lei that I bought at the Dollar Store.
 They only play with the red, white, and blue ones though.  
My patriotic kitties. 


Ellie vetoes my kiss.  haha


In this photo, you can see that pesky red gas can in the background...if you look for it.  I used the Sin City effect again to give color only to Chavy and the cat tree.  

Baby is getting tired of me taking pictures of him.  
Occasionally, as on this day, the camera becomes his play/prey.

I'm going to finish with two different iterations of the same photo to illustrate how the different filters/effects can alter a photo.

We'll start with Chavy's scary claws in Lomo effect from Photoshop Elements II intermediate.

Now the same photo with a gradient filter. 


It's hard, once again, for me to say which one I like better.  
I would probably choose the Lomo because it brings the ball and the claws into focus.  And it's a bit easier to use.

But the bottom line is that editing effects are endless, not just with Photoshop, but there are other good software choices as well, such as Pixlr.  

The fun of photography doesn't have to end once you put down the camera!

xoxo